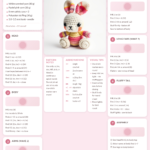
Cute Bunny Crochet Pattern – Free Amigurumi Tutorial
Have you ever wanted to create your own huggable crochet companion? This bunny crochet pattern delivers a soft, adorable amigurumi bunny perfect for gifting or decorating your home. Whether you’re a beginner or an experienced crocheter, this pattern offers a rewarding project that results in a charming stuffed animal.
Amigurumi is the Japanese art of knitting or crocheting small stuffed yarn creatures. What makes this bunny special is its simplicity combined with irresistible cuteness. It’s also an excellent project for practicing basic amigurumi techniques like working in spirals, increasing, and decreasing. Let’s dive into this free crochet bunny pattern and get started!
Why You Will Love This Bunny Crochet
- Beginner-Friendly: Uses basic stitches and simple shaping—ideal for new crocheters.
- Great for Gifts: Perfect for baby showers, birthdays, or Easter decorations.
- Adorable Design: Big floppy ears and a cute tail make it instantly lovable.
- Customizable: Change colors to match your home decor or favorite palette.
- Portable Project: Small enough to take anywhere—perfect for on-the-go crafting.
- Popular on Etsy: Handmade bunny patterns like this sell quickly to creative shoppers.
Materials and Tools You Need
To crochet your bunny, gather these essentials:
| Material | Recommended Type | Quantity |
|---|---|---|
| Yarn | Worsted weight (Size 4), cotton or acrylic | 90 yds (main color), 20 yds (accent color) |
| Crochet Hook | 3.5mm (E/4) | 1 |
| Fiberfill Stuffing | Polyester stuffing | 20g |
| Safety Eyes | 8mm | 2 |
| Stitch Marker | Locking stitch marker | 1 |
| Yarn Needle | Tapestry needle | 1 |
| Scissors | Fabric scissors | 1 |
| Stuffing Tool | Optional: chopstick or hook | 1 |
Not sure whether to use cotton or acrylic yarn? Here’s a quick comparison:
| Feature | Cotton Yarn | Acrylic Yarn |
|---|---|---|
| Durability | Firmer, holds shape well | Softer, slightly stretchy |
| Washability | Machine washable, may shrink | Machine washable, colorfast |
| Texture | Slightly rougher, less stretch | Smooth, easy to work with |
| Best For | Structured amigurumi, baby items | Cuddly plushies, beginners |
For this bunny, I recommend using a soft acrylic yarn in pastel colors for a cozy feel, perfect for little hands to hold.
Step-by-Step Bunny Crochet Pattern
Step 1: Crochet the Head
Start with the head to form the bunny’s main shape.
- Round 1: Make a magic ring. Chain 1 (does not count as stitch), work 6 single crochet (sc) into ring. Pull tight to close. (6)
- Round 2: *2 sc in next stitch* repeat around. (12)
- Round 3: *Sc in next stitch, 2 sc in next stitch* repeat around. (18)
- Round 4: Sc in next 2 stitches, 2 sc in next stitch. Repeat around. (24)
- Round 5–7: Sc in each stitch around. (24)
- Round 8: *Sc in next 2 stitches, sc decrease (sc2tog)* repeat around. (18)
- Round 9: *Sc in next stitch, sc2tog* repeat around. (12)
- Round 10: Sc2tog around. (6)
- Fasten off, leaving a 12-inch tail for sewing. Stuff the head lightly before closing.
Step 2: Crochet the Ears
Make two identical ears.
- Round 1: Magic ring, 6 sc into ring. (6)
- Round 2: *2 sc in next stitch* repeat around. (12)
- Round 3–4: Sc in each stitch around. (12)
- Flatten the top slightly and fold the base inward to create a floppy ear shape. Sew securely to the head on either side.
Step 3: Crochet the Body
The body is slightly larger than the head to give the bunny a rounded look.
- Round 1: Magic ring, 6 sc into ring. (6)
- Round 2: *2 sc in next stitch* repeat around. (12)
- Round 3: *Sc in next stitch, 2 sc in next stitch* repeat around. (18)
- Round 4: Sc in next 2 stitches, 2 sc in next stitch. Repeat around. (24)
- Round 5–12: Sc in each stitch around. (24)
- Round 13: *Sc in next 2 stitches, sc2tog* repeat around. (18)
- Round 14: *Sc in next stitch, sc2tog* repeat around. (12)
- Round 15: Sc2tog around. (6)
- Fasten off, stuff firmly before closing.
Step 4: Crochet the Arms
Make two small arms.
- Round 1: Magic ring, 5 sc into ring. (5)
- Round 2: *2 sc in next stitch* repeat around. (10)
- Round 3–6: Sc in each stitch around. (10)
- Fasten off, leaving a tail to sew to the body. Stuff lightly.
Step 5: Crochet the Legs
Make two slightly wider legs.
- Round 1: Magic ring, 6 sc into ring. (6)
- Round 2: *2 sc in next stitch* repeat around. (12)
- Round 3–8: Sc in each stitch around. (12)
- Fasten off, leaving a tail to sew to the body. Stuff lightly.
Step 6: Special Features: The Fluffy Tail
Crochet a small ball for the tail.
- Round 1: Magic ring, 6 sc into ring. (6)
- Round 2: *2 sc in next stitch* repeat around. (12)
- Round 3: Sc in each stitch. (12)
- Round 4: *Sc in next stitch, sc2tog* repeat around. (8)
- Fasten off, stuff lightly, and sew to the back of the body.
Step 7: Assembly
- Sew the safety eyes onto the head, spaced evenly, about 8 stitches apart.
- Use black yarn to embroider a small nose and mouth above the eyes.
- Sew the ears to the top of the head, slightly tilted forward for a perky look.
- Attach the arms to the sides of the body, slightly forward.
- Sew the legs to the bottom of the body, spaced evenly apart.
- Sew the tail to the back of the body at the base.
- Use the yarn needle to weave in all ends securely.
Crochet Graphic (Bunny Body)
Here’s a visual guide to the bunny’s body shape using ASCII crochet symbols:
● OOO x x x x x x x x x x x x V V A x x x x x x OOO ●
Legend:
| Symbol | Stitch |
|---|---|
| x | Single Crochet (sc) |
| V | Increase (2 sc in next stitch) |
| A | Decrease (sc2tog) |
| O | Chain (ch) |
| ● | Slip Stitch (sl st) |
Finished Measurements
| Measurement | Size (approx.) |
|---|---|
| Height (ears included) | 12 inches |
| Width (widest part) | 8 inches |
| Skill Level | Beginner |
Creative Uses for Your Crochet Bunny
- Baby Shower Gift: Pair with a tiny blanket made from the same yarn.
- Nursery Decoration: Hang from the crib or shelf with ribbon.
- Etsy Product: Sell at craft fairs or online as a handmade plushie.
- Birthday Present: Add a personalized tag with the child’s name.
- Holiday Ornament: Attach a loop for a festive decoration.
- Photo Prop: Use in holiday-themed photoshoots.
Want more project ideas? Check out our beginner-friendly amigurumi patterns for seasonal inspiration!
Common Mistakes to Avoid
- Overstuffing: Can distort stitches and make assembly difficult.
- Inconsistent tension: Leads to uneven texture—keep your stitches tight and even.
- Skipping stitch markers: Use a marker to track rounds and avoid spiraling.
- Ignoring safety eyes: Always attach securely to prevent choking hazards for children.
- Rushing assembly: Take time to align parts evenly before sewing.
Tips for Maximizing Results
- Use a stitch counter: Helps track rounds and prevents mistakes.
- Block your pieces: Lightly steam or wet-block to shape before assembly.
- Try a larger hook: If your stitches are too tight, switch to a 4.0mm for easier stuffing.
- Embroider details last: Add facial features after assembly for better placement.
- Practice the magic ring: Ensures a tight, invisible start to your work.
For more advanced techniques, explore how to improve amigurumi tension in our crochet guide!
Conclusion
This free bunny crochet pattern is your ticket to creating a huggable, handmade companion. Perfect for beginners and ideal for gifting, it combines simplicity with charm. With just a few materials and basic stitches, you’ll have a delightful bunny ready in an afternoon. Whether you’re crafting for a loved one or adding to your home decor, this pattern delivers joy in every stitch.
Ready to start crocheting? Download the free PDF pattern and begin your amigurumi journey today!
Ravelry – Beginner Amigurumi Group is a great place to share your progress and get tips from fellow crafters.
Frequently Asked Questions
- Is this pattern suitable for absolute beginners?
Yes! This pattern uses only basic stitches and includes clear step-by-step instructions. We recommend practicing single crochet and increasing before starting.
- Can I use different yarn weights?
You can, but the finished size will change. Sport or DK weight will yield a smaller bunny, while bulky yarn will make a larger plushie.
- How do I prevent gaps in my amigurumi?
Work tightly and consider using a smaller hook than recommended. You can also wet-block your finished piece to tighten stitches.
- What if I don’t have safety eyes?
You can embroider eyes using yarn or thread. Just be sure they’re securely attached for child-safe play.
- Can I wash the finished bunny?
Yes, hand wash in cold water and lay flat to dry. Avoid machine washing to preserve shape and stitch