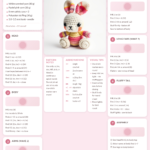
Free Crochet Chick Pattern – Easy Amigurumi Chick
Ever wondered how to crochet a crochet Chick that looks fluffy, cheerful, and ready to brighten any room? Whether you’re a beginner looking to master amigurumi or an experienced crafter wanting a quick project, this Easy Amigurumi Pattern is your perfect match. Crochet chicks make adorable gifts, nursery decorations, and even holiday ornaments—all while being surprisingly simple to make!
Why You Will Love This crochet
- Beginner-Friendly: Perfect for new crocheters thanks to clear, step-by-step instructions.
- Trending Design: Amigurumi animals are booming on Etsy and social media—this Chick is no exception!
- Great Gift Idea: Handmade with love, it’s ideal for baby showers, birthdays, or Easter decorations.
- Nursery Decor: Adds a soft, charming touch to any baby’s room or play area.
- Cute and Customizable: Use different yarn colors to create unique Chicks every time!
- Fast to Make: Complete a stuffed Chick toy in just a few hours.
Materials and Tools You Need
Yarn Colors and Uses
For a classic look, use these yarn choices:
- Yellow: Main body (chicks are naturally yellow!)
- Orange: Beak and feet (a pop of color!)
- Red or Pink: Optional cheek blush for extra cuteness.
Supplies Checklist
- Crochet Hook: 2.5mm (C/2) or size recommended for tight stitches.
- Yarn: Worsted weight (#4) in yellow, orange, and optional highlights.
- Fiberfill Stuffing: Polyester stuffing for a soft, huggable finish.
- Safety Eyes: 8mm black safety eyes (or embroider eyes if preferred).
- Stitch Marker: To mark your starting point.
- Yarn Needle: For weaving in ends and sewing parts together.
- Scissors: Sharp embroidery scissors for clean cuts.
Yarn Type Comparison Table
| Feature | Cotton Yarn | Acrylic Yarn |
|---|---|---|
| Stiffness | Holds shape well | Softer, drapes more |
| Durability | Long-lasting, less piling | May pill over time |
| Price | Moderate to high | Affordable |
| Best For | Dolls, baskets, sturdy projects | Stuffed animals, baby items |
Step-by-Step Chick Crochet Pattern
This pattern uses US crochet terms. Begin each part with a magic ring unless noted. Use a stitch marker to track rounds.
Step 1: Crochet the Head
Start with yellow yarn.
- Round 1: Magic ring, 6 sc into ring. (6)
- Round 2: 2 sc in each st. (12)
- Round 3: *Sc in next st, 2 sc in next st* around. (18)
- Round 4: Sc in next 2 sts, 2 sc in next st, *sc in next 3 sts, 2 sc in next st* around. (24)
- Rounds 5–8: Sc in each st around. (24)
- Round 9: *Sc in next 3 sts, sc2tog* around. (18)
- Round 10: Sc2tog around. (9)
- Fasten off, leaving a long tail for sewing.
Step 2: Face Patch / Eye Markings
Embroider eyes using black yarn or attach 8mm safety eyes between Rounds 5 and 6, spaced 8 sts apart.
Optional: Add blush with pink yarn using a yarn needle to make small dots on cheeks (Rounds 6–7 area).
Step 3: Crochet the Body
- Round 1: Magic ring, 6 sc into ring. (6)
- Round 2: 2 sc in each st. (12)
- Round 3: *Sc in next st, 2 sc in next st* around. (18)
- Round 4: Sc in each st around. (18)
- Rounds 5–10: Sc in each st around. (18)
- Round 11: *Sc in next 2 sts, sc2tog* around. (14)
- Round 12: Sc2tog around. (7)
- Stuff firmly before closing.
- Fasten off, leave tail for sewing.
Step 4: Crochet the Arms (make 2)
- Round 1: Magic ring, 6 sc into ring. (6)
- Rounds 2–3: Sc in each st around. (6)
- Flatten slightly and sew flat to body sides using orange yarn.
Step 5: Crochet the Legs (make 2)
- Round 1: Magic ring, 6 sc into ring. (6)
- Round 2: 2 sc in each st. (12)
- Rounds 3–5: Sc in each st around. (12)
- Flatten and sew flat to the bottom of the body.
Step 6: Special Features Unique to the Chick
- Beak: With orange yarn, chain 3, sc in second ch from hook, sl st in next ch. Sew to face below eyes.
- Feet: Embroider small orange lines on the bottom of legs, or crochet a tiny triangle and sew on.
- Wings (optional): Chain 4, sc in second ch from hook, hdc in next, dc in last. Sew to sides of body.
Step 7: Assembly
- Sew head to top of body using yarn needle and tail.
- Sew arms and legs securely to body.
- Weave in all ends with yarn needle.
- Optional: Add a tiny bow or flower using scrap yarn or felt.
Crochet Graphic (Chick Body)
Here’s a simplified ASCII chart of the Chick’s body shape. Each line represents a round or row.
● O O O O O O ● ● x x x x x x x ● ● x x x x x x x x x ● ● x V V x x V V x x ● ● x x x V x V x x x ● ● x x x x x x x x x ● ● A A x x x A A ● ● x x x x x x x ● ● x x x x x x ● ● O O O O ●
Legend:
| Symbol | Meaning |
|---|---|
| x | Single Crochet (sc) |
| V | Increase (2 sc in next st) |
| A | Decrease (sc2tog) |
| O | Chain stitch (ch) |
| ● | Slip Stitch (sl st) |
Note: This is a stylized representation. Always follow written instructions for accuracy.
Finished Measurements
| Measurement | Size |
|---|---|
| Height | Approx. 5 inches (13 cm) |
| Width (at widest point) | Approx. 3.5 inches (9 cm) |
| Skill Level | Beginner |
Creative Uses for Your Crochet Chick
- Baby Shower Gift: Pair your handmade Chick with a pacifier clip or small blanket.
- Nursery Decoration: Hang from a mobile or place on a shelf for a playful touch.
- Etsy Product: Sell your crochet plushie or offer custom color options.
- Birthday Present: Great for kids who love animals—safe, soft, and huggable!
- Holiday Ornament: Add a loop and hang on a tree or give as a keepsake.
- Photo Prop: Use in baby photos or as a cute Easter decoration.
Common Mistakes to Avoid
- Overstuffing: Can distort the shape and make stitches too tight to close.
- Loose Tension: Leads to visible stuffing and a floppy yarn Chick.
- Skipping stitch markers: Easy to lose track of rounds, especially in the head.
- Using too large a hook: Makes gaps between stitches—stick to the recommended size.
- Neglecting to weave in ends: Can cause unraveling over time.
Tips for Maximizing Results
- Use a stitch marker: Helps prevent accidental increases or decreases.
- Count your stitches: After every round to ensure accuracy.
- Try a standing sc: To start rounds neatly without a slip knot.
- Block your pieces: Gently steam or pin to shape before assembly.
- Personalize: Add embroidered patches, tiny hats, or bows for custom designs.
Conclusion
Now that you have a complete guide, you’re ready to create your own adorable amigurumi Chick! Whether it’s for a gift, a nursery decoration, or a fun weekend project, this Easy Amigurumi Pattern delivers charm and simplicity. Crochet is more than just a hobby—it’s a way to bring joy, one stitch at a time. Don’t wait—download the free pattern and start crocheting your Chick today!
Frequently Asked Questions
Can beginners make this crochet Chick pattern?
Absolutely! This pattern uses basic stitches (sc, increases, decreases) and includes clear instructions perfect for beginners. We recommend practicing a few rounds before starting the full project.
What type of yarn should I use for the stuffed Chick toy?
Worsted weight (#4) acrylic or cotton yarn works best. Acrylic is affordable and soft; cotton holds stitches tightly, ideal for beginners.
How much time does it take to complete?
Most crafters finish a handmade Chick in 2–4 hours, depending on skill level and embellishments.
Can I sell the finished crochet plushie?
Yes! Many crafters sell amigurumi on Etsy and at craft fairs. Just be sure to credit the pattern if required.
What size safety eyes should I use?
8mm safety eyes are ideal for this project, matching the scale of the Chick. Always supervise children with small parts.
Do I need to use a stitch marker?
While optional, it’s highly recommended to mark the start of each round and prevent accidental increases or decreases.
Can I crochet this Chick in different colors?
Of course! Try pastel pink, white, or even a rainbow Chick for a fun twist. The pattern works with any color combo.