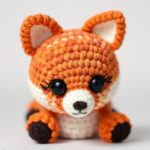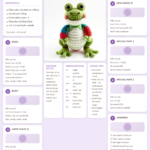
Free Red Fox Crochet Pattern – Easy Amigurumi Red Fox
Have you ever dreamed of creating a whimsical little creature that brings joy to everyone who sees it? Imagine crafting a crochet Red Fox that’s not only adorable but also a perfect addition to your home decor or a heartfelt gift. This Amigurumi Red Fox crochet pattern is designed to be both fun and beginner-friendly, making it an ideal project for crochet enthusiasts of all skill levels.
Whether you’re looking to spruce up your nursery, surprise a loved one, or simply enjoy the therapeutic process of crocheting, this cute crochet animal is the perfect choice. Plus, it’s a wonderful way to practice your amigurumi skills while creating something truly special. Ready to get started? Let’s dive into this free crochet pattern and bring your Red Fox to life!
Why You Will Love This crochet
This crochet Red Fox pattern is more than just a craft project—it’s a gateway to creativity, relaxation, and endless possibilities. Here’s why you’ll adore it:
- Perfect for Beginners: With clear, step-by-step instructions, this pattern is ideal for those new to crochet or amigurumi.
- Trending and Adorable: Red foxes are in high demand as handmade toys and decor, making this pattern a must-have for any crochet enthusiast.
- Great Gift Idea: Handmade gifts carry a special touch, and this crochet plushie is sure to delight children and adults alike.
- Versatile Decor: Whether placed on a shelf, used as a baby shower gift, or hung as a holiday ornament, this Red Fox will steal the show.
- Popular Etsy Seller Favorite: Many crafters have turned their love for amigurumi into successful Etsy shops—this pattern could be your next big project!
- Endless Customization: Change the colors, add accessories, or modify the size to create a unique handmade Red Fox that’s truly yours.
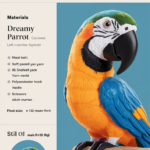
Materials and Tools You Need
To bring your crochet Red Fox to life, you’ll need the right materials and tools. Here’s a detailed list to ensure your project goes smoothly:
Yarn Colors and Uses
For this yarn Red Fox, you’ll need the following yarn colors:
- Orange: Main body color (approximately 150g for a 9-inch fox).
- White: Belly, face markings, and tail tip (50g).
- Black: Nose, eye patches, and tail tip accents (20g).
- Brown: Inner ears and subtle fur details (10g).
Supplies Checklist
- Crochet Hook: 3.5mm (E/4) for tight stitches, or 4.0mm (G/6) for looser stitches if preferred.
- Safety Eyes: 8mm (2) for a lifelike look, or embroidered eyes for a softer appearance.
- Fiberfill Stuffing: Polyester fiberfill for a plush, cuddly feel.
- Stitch Marker: To keep track of your rounds.
- Yarn Needle: For sewing parts together and weaving in ends.
- Scissors: Sharp scissors for cutting yarn.
- Fabric Glue (Optional): To secure the nose and other small details.
Yarn Comparison Table
| Feature | Cotton Yarn | Acrylic Yarn |
|---|---|---|
| Durability | Strong and long-lasting, holds shape well | Can stretch over time, less durable |
| Texture | Smooth and firm, great for stitch definition | Softer but may be slippery, harder to work with |
| Washability | Machine washable, retains color | Machine washable but may pill or fade |
| Cost | More expensive | Budget-friendly |
| Best For | Amigurumi, home decor, items needing structure | Beginners, gifts, items needing softness |
Step-by-Step Red Fox Crochet Pattern
Follow these detailed instructions to crochet your adorable Red Fox. Each step includes round-by-round counts to ensure accuracy and consistency. Remember to use a stitch marker to mark the beginning of each round!
Step 1: Crochet the Head
Start with the head, which forms the foundation of your fox. Use orange yarn for the main color.
- Round 1: Magic ring, 6 sc into the ring. (6)
- Round 2: 2 sc in each st around. (12)
- Round 3: *Sc in next st, 2 sc in next st*, repeat from * to * around. (18)
- Round 4: *Sc in next 2 sts, 2 sc in next st*, repeat from * to * around. (24)
- Rounds 5–8: Sc in each st around. (24)
- Round 9: *Sc in next 2 sts, sc2tog*, repeat from * to * around. (18)
- Round 10: Sc2tog around. (9)
- Fasten off and leave a long tail for sewing.
Step 2: Face Patch / Eye Markings
For the Red Fox’s distinctive face, use white yarn to create the belly and face markings. Attach the safety eyes or embroider the eyes between Rounds 6 and 7, spacing them 6 stitches apart. Embroider a small black nose between the eyes using black yarn.
Step 3: Crochet the Body
The body tapers slightly at the top and bottom to give your fox a natural shape.
- Round 1: Magic ring, 6 sc into the ring. (6)
- Round 2: 2 sc in each st around. (12)
- Round 3: *Sc in next st, 2 sc in next st*, repeat from * to * around. (18)
- Round 4: *Sc in next 2 sts, 2 sc in next st*, repeat from * to * around. (24)
- Rounds 5–10: Sc in each st around. (24)
- Round 11: *Sc in next 2 sts, sc2tog*, repeat from * to * around. (18)
- Round 12: Sc2tog around. (9)
- Fasten off and leave a long tail for sewing.
Step 4: Crochet the Arms
Foxes have slender arms, so keep them proportional to the body.
- Chain 6, then sc in the second chain from the hook and each chain across. (5)
- Row 2: Turn, sc in each st across. (5)
- Rows 3–5: Repeat Row 2.
- Fasten off and leave a tail for sewing. Make 2.
Step 5: Crochet the Legs
The legs should be slightly longer than the arms to give your fox a natural stance.
- Chain 7, then sc in the second chain from the hook and each chain across. (6)
- Row 2: Turn, sc in each st across. (6)
- Rows 3–6: Repeat Row 2.
- Fasten off and leave a tail for sewing. Make 2.
Step 6: Special Features Unique to the Red Fox
Give your fox its signature look with these details:
- Ears: Crochet two small triangles using orange yarn and line them with white and brown yarn for a realistic touch.
- Tail: Chain 12, then sc in the second chain from the hook and each chain across. Fold and sew to create a bushy tail. Attach white and black yarn for the tip.
- Paws: Use white yarn to crochet small circles (6 sc in a magic ring) and sew them to the ends of the arms and legs.
Step 7: Assembly
Now it’s time to bring all the pieces together!
- Attach the Head: Sew the head to the top of the body, aligning the stitches.
- Sew on the Ears: Position the ears on either side of the head and sew them in place.
- Attach the Arms and Legs: Sew the arms to the sides of the body and the legs to the bottom, spacing them evenly.
- Add the Tail: Sew the tail to the back of the body, fluffing it to create a bushy effect.
- Embroider Details: Use black yarn to embroider the nose, eye patches, and any additional markings.
- Stuff Firmly: Before closing the final openings, stuff the fox with fiberfill to give it a plump, cuddly shape.
Crochet Graphic (Red Fox Body)
Use this ASCII art chart as a visual guide for the body shape of your Red Fox. The graphic reflects the wider middle and tapered top and bottom, typical of amigurumi animals.
● ● ● ● ● ● ● ● ● ● ● x x x x x x x x x x ● ● x x x x x x V V x x x x x ● ● x x x A x x x x x A x x x ● ● x x x x x x x x x x x x x ● ● x x x x x x O O x x x x x ● ● x x x x x x x x x x x x x ● ● x x x x x x x x x x ● ● ● ● ● ● ● ● ● ● ●
Legend:
| Symbol | Stitch |
|---|---|
| x | Single Crochet (sc) |
| V | Increase (2 sc in one stitch) |
| A | Decrease (sc2tog) |
| O | Chain (ch) |
| ● | Slip Stitch (sl st) |
Finished Measurements
Here’s what you can expect from your crochet Red Fox:
| Measurement | Size |
|---|---|
| Height | 9 inches (23 cm) |
| Width (across body) | 5 inches (13 cm) |
| Skill Level | Beginner |
Creative Uses for Your Crochet Red Fox
Your crochet Red Fox is more than just a toy—it’s a versatile addition to your home and a thoughtful gift for any occasion. Here are some creative ways to use it:
- Baby Shower Gift: A soft, handmade crochet plushie is a cherished keepsake for new parents.
- Nursery Decoration: Place your fox on a shelf or hang it as a mobile to add a whimsical touch to a child’s room.
- Etsy Product: Turn your passion into profit by selling your creations on Etsy shop setup guide.
- Birthday Present: A custom handmade Red Fox makes a unique and memorable gift for animal lovers.
- Holiday Ornament: Add a festive touch to your Christmas tree with a mini version of your fox.
- Photo Prop: Use your fox in photoshoots or as a prop for social media content.
Common Mistakes to Avoid
Even the most experienced crocheters encounter challenges. Here are some pitfalls specific to this Red Fox pattern and how to avoid them:
- Inconsistent Tension: Keep your stitches tight and even to maintain a uniform shape. Loose stitches can make your fox look floppy.
- Skipping Stitch Markers: Always use a stitch marker to track your rounds. Missing it can lead to uneven increases or decreases.
- Overstuffing: While stuffing is essential, overstuffing can distort the shape of your fox. Stuff firmly but not excessively.
- Ignoring the Tail: