Introduction
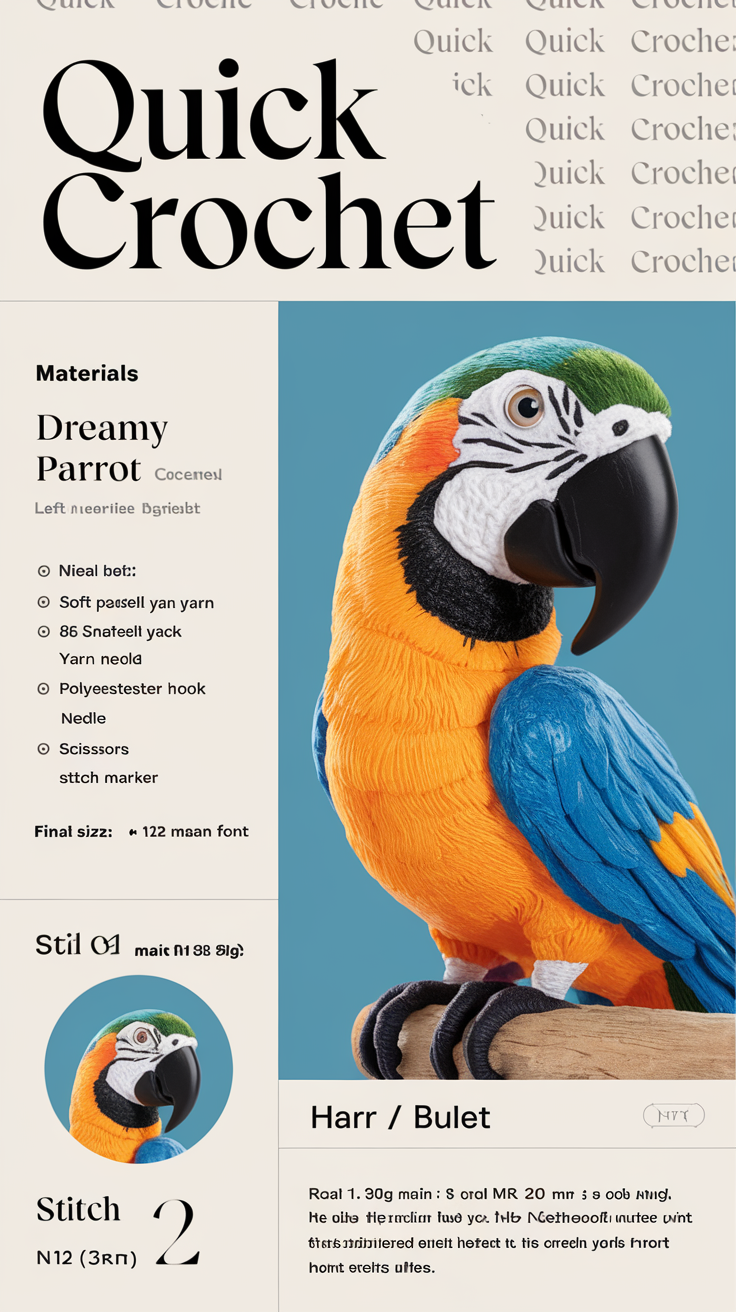
Have you ever wanted to bring a splash of tropical charm into your home—without the noise of a real parrot? Meet your new favorite crochet companion: a vibrant, handmade amigurumi parrot that’s as fun to make as it is to display! Whether you’re a seasoned crocheter or just starting out, this easy amigurumi parrot pattern is your ticket to creating a cute, cuddly bird that’s perfect for gifting, decorating, or simply brightening your day. With its bright colors, playful personality, and beginner-friendly design, this little bird is sure to become a cherished addition to any crochet collection.
In this step-by-step guide, we’ll cover everything from the materials you’ll need to detailed stitch-by-stitch instructions for crafting every part of your parrot. You’ll learn how to shape the head, body, wings, and tail, and even add those signature parrot markings. By the end, you’ll have a stunning, handmade crochet plushie that’s ready to perch on a shelf, adorn a nursery, or star as a heartfelt gift. So grab your yarn and hook—let’s get started!
Why You Will Love This crochet
- Trending and Adorable: Amigurumi parrots are a hit on social media platforms like TikTok and Instagram—your creation will be the envy of your feed!
- Beginner-Friendly: This pattern uses basic stitches and simple techniques, making it ideal for new crocheters looking to build confidence.
- Perfect Gift Idea: Handmade stuffed parrots make heartfelt presents for birthdays, holidays, or baby showers.
- Nursery Decor: Bright, cheerful colors make this parrot a whimsical addition to any child’s room or play area.
- Popular on Etsy: Many crafters sell similar patterns on Etsy—now you can make your own and save money!
- Cute and Customizable: Change the colors to match your favorite parrot species or add unique details like a mohawk or spots.
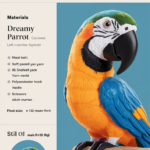
Materials and Tools You Need
Before you begin, gather your supplies. Here’s what you’ll need to create your crochet parrot:
Yarn Colors (for a classic green parrot)
- Green: Main body color (e.g., worsted weight cotton or acrylic yarn)
- Red: Beak and optional wing accents
- Yellow: Eye ring and optional chest feathers
- Blue: Optional tail feathers or head markings
- Black: Eye pupils (or use safety eyes)
Pro Tip: For durability and a polished look, opt for 100% acrylic yarn or cotton yarn. Acrylic is budget-friendly and easy to care for, while cotton offers a stiffer finish that helps the parrot hold its shape.
Supplies
- Crochet Hook: Size 3.5 mm (E/4) for tight stitches that prevent stuffing from showing
- Safety Eyes: 8–10 mm (optional, can embroider eyes instead)
- Fiberfill Stuffing: Polyester or kapok for a soft, huggable feel
- Stitch Marker: Helps track rounds in continuous crochet
- Yarn Needle: For sewing parts together and weaving in ends
- Scissors: Small, sharp scissors for trimming yarn
- Fabric Glue (optional): For securing small parts like the beak
Yarn Comparison Table
| Material | Pros | Cons | Best For |
|---|---|---|---|
| Cotton Yarn | Durable, holds shape well, eco-friendly | Can be stiff, less stretchy | Amigurumi that needs structure (e.g., parrot tail) |
| Acrylic Yarn | Affordable, soft, wide color range, easy to care for | Less eco-friendly, may stretch over time | Everyday amigurumi, gifts, beginners |
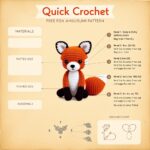
Step-by-Step Parrot Crochet Pattern
This pattern is worked in continuous rounds using the spiral method. Use a stitch marker to track the beginning of each round.
Step 1: Crochet the Head
Round 1: Magic circle, 6 sc in circle. (6)
Round 2: 2 sc in each st around. (12)
Round 3: (Sc in next st, 2 sc in next st) x6. (18)
Round 4: Sc in next 2 sts, 2 sc in next st, (sc in next 3 sts, 2 sc in next st) x4, sc in next 2 sts. (24)
Round 5: Sc in each st around. (24)
Round 6: Sc in next 3 sts, 2 sc in next st, (sc in next 4 sts, 2 sc in next st) x4, sc in next 3 sts. (30)
Rounds 7–10: Sc in each st around. (30)
Round 11: Sc in next 4 sts, 2 sc in next st, (sc in next 5 sts, 2 sc in next st) x4, sc in next 4 sts. (36)
Rounds 12–15: Sc in each st around. (36)
Round 16: Sc in next 5 sts, 2 sc in next st, (sc in next 6 sts, 2 sc in next st) x4, sc in next 5 sts. (42)
Rounds 17–20: Sc in each st around. (42)
Round 21: (Sc in next 6 sts, 2 sc in next st) x6. (48)
Rounds 22–24: Sc in each st around. (48)
Fasten off. Leave a long tail for sewing.
Step 2: Crochet the Beak
Round 1: Magic circle, 4 sc in circle. (4)
Round 2: 2 sc in each st around. (8)
Rounds 3–4: Sc in each st around. (8)
Fasten off. Sew to the center of the face.
Step 3: Crochet the Body
Round 1: Magic circle, 6 sc in circle. (6)
Round 2: 2 sc in each st around. (12)
Round 3: (Sc in next st, 2 sc in next st) x6. (18)
Round 4: Sc in next 2 sts, 2 sc in next st, (sc in next 3 sts, 2 sc in next st) x4, sc in next 2 sts. (24)
Rounds 5–15: Sc in each st around. (24) Note: Stuff firmly as you go.
Round 16: (Sc in next 3 sts, sc2tog) x6. (18)
Round 17: Sc in each st around. (18)
Round 18: (Sc in next 2 sts, sc2tog) x6. (12)
Stuff lightly. Fasten off. Leave a long tail for sewing.
Step 4: Crochet the Wings (make 2)
Row 1: Ch 6. Sc in 2nd ch from hook and each st across. Turn. (5)
Rows 2–4: Ch 1, sc in each st across. Turn. (5)
Fasten off. Sew to the sides of the body.
Step 5: Crochet the Tail
Round 1: Magic circle, 5 sc in circle. (5)
Round 2: 2 sc in each st around. (10)
Round 3: Sc in each st around. (10)
Rounds 4–6: Ch 1, sc in each st around, slip stitch to join. Fasten off. Sew to the back of the body.
Step 6: Assemble the Parrot
- Attach the head: Sew the head to the top of the body using the long tail. Align the stitches for a seamless look.
- Add safety eyes: Insert 8–10 mm safety eyes between Rounds 18–20 of the head. Space them about 6 stitches apart.
- Sew the beak: Position the beak at the center of the face, just below the eyes.
- Attach wings: Sew the wings to the sides of the body, slightly angled downward.
- Add tail: Sew the tail to the back of the body, flaring the feathers outward.
- Weave in ends: Use the yarn needle to hide all loose ends inside the parrot.
Crochet Graphic (Parrot Body)
Below is an ASCII representation of the parrot body shape. Use this as a visual guide for stitch placement.
● / \ / \ x x / \ / \ x x x x / \ V / \ x x A x x \ / \ / x x \ / ● ● \ /
Legend:
| Symbol | Stitch |
|---|---|
| x | Single Crochet (sc) |
| V | Increase (2 sc in same st) |
| A | Decrease (sc2tog) |
| O | Chain (ch) |
| ● | Slip Stitch (sl st) |
Finished Measurements
| Measurement | Size |
|---|---|
| Height | Approximately 8 inches (20 cm) |
| Width (at widest point) | About 5 inches (13 cm) |
| Skill Level | Beginner |
Creative Uses for Your Crochet Parrot
- Baby Shower Gift: Pair your parrot with a handmade nest or perch for a memorable newborn present.
- Nursery Decoration: Hang your parrot from a mobile or place it on a bookshelf for a playful touch.
- Etsy Product: Sell your parrots at craft fairs or on Etsy as handmade plushies.
- Birthday Present: Customize the colors to match the recipient’s favorite hues or interests.
- Holiday Ornament: Add a loop of yarn to the top and hang your parrot on the Christmas tree.
- Photo Prop: Use your parrot in themed photo shoots or as a backdrop for kids’ pictures.
Common Mistakes to Avoid
- Skipping Stuffing: Under-stuffing can make your parrot look flat. Stuff firmly but don’t overpack.
- Ignoring Tension: Inconsistent tension leads to visible stitches. Keep your stitches tight and even.
- Skipping Stitch Markers: Without a stitch marker, it’s easy to lose track of rounds, especially in larger pieces.
- Rushing Assembly: Take your time when sewing parts together to ensure symmetry and a polished look.
- Using the Wrong Yarn: Avoid slippery or stretchy yarns like wool blends for amigurumi—they won’t hold the shape well.
Tips for Maximizing Results
- Use a Hook One Size Smaller: For tighter stitches that hide stuffing, try a 3.25 mm hook if you’re comfortable with tension.
- Weave in Ends as You Go: This prevents loose ends from popping out later and saves time in the end.
- Block Your Parrot: Lightly steam or wet block your finished parrot to help it hold its shape and relax stitches.
- Experiment with Colors: Try ombré yarn or variegated colors for a unique, rainbow-like parrot.
- Add a Keychain Ring: Attach a small keychain ring to the top of the head so you can take your parrot on the go!
Conclusion
Congratulations! You’ve just created a charming, handmade crochet parrot that’s as fun to make as it is to admire. This easy amigurumi parrot pattern is perfect for crocheters of all skill levels, offering a delightful project that results in a cute, cuddly plushie. Whether you keep it as a treasured keepsake or gift it to a loved one, your parrot is sure to bring smiles and a touch of tropical flair wherever it goes.
Ready to start your next crochet adventure? Download the free pattern and begin stitching your parrot today! Don’t forget to share your creation with #CrochetParrot on social media—we’d love to see your colorful creations!