Introduction
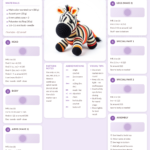
Ever wondered what it takes to crochet your very own amigurumi zebra that looks ready to gallop off your yarn stash? This crochet pattern is perfect for crafters of all levels—yes, even if you’re just starting your crochet animal pattern journey. Whether you’re crafting a stuffed zebra toy for a baby shower gift or adding a handmade zebra to your nursery decor, this project is both fun and rewarding.
The zebra’s classic black-and-white stripes make it a timeless choice for crocheters, and with this easy amigurumi pattern, you’ll create a plushie that’s as cute as it is durable. Ready to make a crochet zebra that stands out? Let’s dive into this complete guide!
Why You Will Love This crochet
- Beginner-Friendly: Perfect for new amigurumi makers with step-by-step instructions.
- Gift-Worthy: A heartfelt handmade zebra makes a unique birthday or baby shower present.
- Nursery Decor: Add a touch of whimsy to a child’s room with a crochet plushie.
- Trending Design: Amigurumi zebras are popular on Etsy and craft fairs.
- Customizable: Adjust yarn colors or add stripes for a personalized touch.
- Portable Project: Crochet your zebra anywhere with just a small hook and yarn.
Materials and Tools You Need
Gather these supplies before starting your crochet zebra:
Yarn Colors
- White: Main body (acrylic or cotton yarn recommended).
- Black: Stripes, ears, legs, tail, and snout accents.
- Gray (optional): For subtle shading in the mane or hooves.
Supplies
- Crochet hook: 3.5mm (E/4) for tight stitches.
- Safety eyes: 8–10mm (or embroider eyes if preferred).
- Fiberfill stuffing: High-quality polyester filling.
- Stitch marker: To track rounds.
- Yarn needle: For sewing parts together.
- Scissors: Sharp embroidery scissors for clean cuts.
Yarn Comparison Table
| Yarn Type | Pros | Cons | Best For |
|---|---|---|---|
| Cotton: Durable, holds shape well. | Sturdy, less stretchy, great for beginners. | Less soft, may split if worked too tightly. | Amigurumi, structured projects. |
| Acrylic: Affordable, soft, widely available. | Budget-friendly, easy to find, machine-washable. | Can stretch, less eco-friendly. | Gifts, washable items. |
Tip: For a plushie that holds its shape, use 100% cotton yarn like Lily Sugar ‘n Cream or Paintbox Yarns.
Step-by-Step Zebra Crochet Pattern
Step 1: Crochet the Head
Start with a magic ring and follow these rounds:
- Round 1: 6 sc into ring. (6)
- Round 2: Inc in each stitch. (12)
- Round 3: (sc in next stitch, inc) x6. (18)
- Round 4: (sc in next 2 stitches, inc) x6. (24)
- Round 5–7: Sc in each stitch. (24)
- Round 8: (sc in next 2 stitches, dec) x6. (18)
- Round 9: Dec around. (9)
- Fasten off: Leave a long tail for sewing.
Tip: Stuff the head lightly as you go to maintain shape.
Step 2: Face Patch / Eye Markings
For the zebra’s signature face:
- Embroider black stripes on the forehead using a yarn needle.
- Attach safety eyes between Rounds 5–6, spaced 4 stitches apart.
- Use black yarn to embroider a small triangle for the snout.
Step 3: Crochet the Body
- Round 1: 6 sc into ring. (6)
- Round 2: Inc in each stitch. (12)
- Round 3: (sc in next stitch, inc) x6. (18)
- Round 4–9: Sc in each stitch. (18)
- Round 10: (sc in next 2 stitches, dec) x4, sc in last 2. (14)
- Round 11: Dec around. (7)
- Fasten off: Leave a tail for sewing.
Step 4: Crochet the Arms
Make 2 arms:
- Round 1: 6 sc into ring. (6)
- Rounds 2–4: Sc in each stitch. (6)
- Fasten off: Leave a long tail for sewing.
Tip: Flatten the top slightly when sewing to give a natural bend.
Step 5: Crochet the Legs
Make 4 legs:
- Round 1: 6 sc into ring. (6)
- Rounds 2–6: Sc in each stitch. (6)
- Fasten off: Leave a tail for sewing.
Step 6: Special Features Unique to the Zebra
- Ears: Make 2 ears with black and white yarn:
- Chain 5, starting in 2nd chain from hook: sc, hdc, dc, hdc. Fasten off.
- Fold and sew to the head, alternating black and white sections.
- Tail: Chain 8, starting in 2nd chain from hook: sc, hdc, dc, hdc, sl st in last stitch. Fasten off and attach to the back.
- Mane: Cut 8–10 strands of black yarn (4 inches long) and attach along the neckline.
Step 7: Assembly
- Sew the head to the body using the tail from the head.
- Attach arms between Rounds 3–4 of the body.
- Sew legs to the bottom, spacing evenly.
- Add safety eyes or embroider eyes and snout.
- Stuff the body firmly with fiberfill before closing.
Crochet Graphic: Zebra Body
Use this ASCII chart to visualize the zebra’s body shape:
O O O O O O O O O O O O O O O O O O O O O O O O O O O O O O O O
Legend:
| Symbol | Meaning |
| O | Chain (ch) |
| x | Single Crochet (sc) |
| V | Increase (inc) |
| A | Decrease (dec) |
| ● | Slip Stitch (sl st) |
Finished Measurements
| Height: | Approx. 10 inches (25 cm) |
| Width (Body): | Approx. 5 inches (12 cm) |
| Skill Level: | Beginner |
Creative Uses for Your Crochet Zebra
- Baby Shower Gift: Pair with a crochet lovey pattern for a keepsake.
- Nursery Decor: Hang from a mobile or place on a shelf.
- Etsy Product: Sell as a handmade plushie; Etsy Trends shows zebras are in demand.
- Birthday Present: Personalize with a child’s name in embroidery.
- Holiday Ornament: Add a loop for a tree decoration.
Common Mistakes to Avoid
- Overstuffing: Can distort stitches; stuff firmly but not too tight.
- Inconsistent Tension: Keep stitches tight for amigurumi to prevent gaps.
- Skipping Stitch Markers: Use them to count rounds accurately.
- Ignoring Safety Eyes: Secure them tightly to avoid choking hazards for kids.
Tips for Maximizing Results
- Use a Stitch Counter: Helps track rounds and decreases.
- Block Your Pieces: Lightly steam or wet-block parts for a polished look.
- Weave in Ends Securely: Use a yarn needle to hide tails on the inside.
- Experiment with Stripes: Try vertical or horizontal stripes for a unique zebra.
- Join Yarn Invisibly: Use the Russian join or magic knot for seamless color changes.
Conclusion
There you have it—a complete free crochet pattern for an adorable amigurumi zebra! This crochet zebra project is perfect for beginners, gifts, and decor alike. Whether you’re making a handmade zebra for a loved one or adding to your yarn collection, this pattern delivers.
Ready to start crocheting? Download the free pattern and grab your yarn—your next favorite cute crochet animal is just a few stitches away!
Frequently Asked Questions
- Can I use bulky yarn for this pattern?
It’s not recommended—bulky yarn may distort the shape. Stick to worsted weight or DK yarn for best results.
- How do I adjust the size of my zebra?
Use a larger hook or yarn weight to increase size; a smaller hook reduces it.
- What’s the best way to sew parts together?
Use a whipstitch or mattress stitch for invisible seams. Avoid visible knots.
- Can I crochet this zebra for a baby?
Yes! Ensure safety eyes are securely fastened and use soft, washable yarn.
- How long does it take to crochet a zebra?
Approximately 4–6 hours for a beginner, depending on speed and experience.
- Can I sell zebras made from this pattern?
Yes! Always credit the designer and link to the original pattern if selling online.
- What’s the best stitch for amigurumi?
Single crochet (sc) creates tight stitches; use a 3.5mm hook for 3.25mm yarn to prevent gaps.