Introduction
Have you ever dreamed of bringing a tropical Toucan to life with just yarn and a hook? This crochet Toucan pattern makes it possible — even if you’re a beginner! With its vibrant colors and friendly face, this amigurumi Toucan is the perfect project for anyone who loves crochet animals. Whether you’re crafting a handmade gift, a nursery decoration, or just a cute plushie for your desk, this pattern delivers charm and simplicity in every stitch.
This easy amigurumi pattern is designed to be beginner-friendly, using basic crochet stitches like single crochet, increases, and decreases. You’ll create a huggable, colorful Toucan with a big beak and expressive eyes — all in one relaxing weekend project. Ready to start? Grab your hook and let’s make a Toucan that’s as fun to crochet as it is to hug!
Why You Will Love This crochet
- Perfect for Beginners: Uses basic stitches and clear, step-by-step instructions — no advanced techniques required.
- Trending & Cute: Toucan-themed toys are top sellers on platforms like Etsy and Instagram — this pattern helps you ride the trend.
- Great Gift Idea: Handmade Toucan plushies make heartfelt gifts for birthdays, baby showers, and holidays.
- Nursery Decor Hero: Add a pop of tropical color to a baby’s room with this adorable yarn Toucan.
- Instant Download: Get the full pattern for free — no subscription or login needed.
- Etsy-Proven Design: Inspired by best-selling amigurumi patterns, this Toucan is designed to sell if you want to monetize your hobby.
Materials and Tools You Need
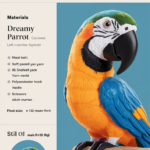
To crochet your Toucan, gather these essential materials. We’ve chosen a palette that captures the Toucan’s natural beauty while keeping the project soft and durable.
Yarn Colors and Uses
- Black: Main body and head (for contrast and classic Toucan look)
- Bright Orange: Beak and eye rings
- Yellow: Chest patch and beak tip
- White: Eye patches (optional for expression)
- Sky Blue: Optional accent for wings or tail
For best results, use medium-weight yarn (worsted, #4). For durability and washability, acrylic yarn is ideal. If you prefer a natural feel, cotton yarn offers structure — but may be slightly less soft.
Supplies Checklist
| Item | Purpose | Recommended Type |
|---|---|---|
| Crochet Hook | To create tight stitches and prevent stuffing from showing | 3.5mm (E/4) |
| Safety Eyes | For a safe, expressive face | 12mm (black) |
| Fiberfill Stuffing | To give your Toucan shape and softness | Polyester stuffing (hypoallergenic) |
| Stitch Marker | To mark the start of rounds in amigurumi | Locking stitch marker |
| Yarn Needle | For sewing parts together and weaving in ends | Blunt tapestry needle |
| Scissors | For cutting yarn cleanly | Sharp embroidery scissors |
| Yarn | Primary yarn for body, accents for beak and chest | Worsted weight (#4), 100% acrylic or cotton |
Cotton vs. Acrylic Yarn for Amigurumi:
- Acrylic: Soft, affordable, widely available, and easy to care for. Best for beginners and frequent washing.
- Cotton: Stronger stitch definition, eco-friendly, and great for structured pieces. Can be less forgiving if over-stretched.
For this Toucan, we recommend acrylic worsted yarn for its balance of softness, color availability, and ease of use. Brands like Red Heart Super Saver or Lion Brand Vanna’s Choice are excellent choices.
Step-by-Step Toucan Crochet Pattern
Let’s start crocheting! Follow these rounds carefully, using a stitch marker to keep track of your progress. Keep your tension firm but not tight to maintain the amigurumi’s shape.
Step 1: Crochet the Head
Start with black yarn.
- Round 1: Magic ring, 6 sc into ring. (6)
- Round 2: Inc in each st. (12)
- Round 3: [Sc, inc] x6. (18)
- Round 4: [Sc in next 2 st, inc] x6. (24)
- Round 5: Sc in each st. (24)
- Round 6: [Sc in next 3 st, inc] x6. (30)
- Rounds 7–10: Sc in each st. (30)
- Round 11: [Sc in next 3 st, dec] x6. (24)
- Round 12: [Sc in next 2 st, dec] x6. (18)
- Round 13: [Sc, dec] x6. (12)
- Round 14: Dec around. (6)
Fasten off, leaving a long tail for sewing. Flatten and stuff the head lightly before closing.
Step 2: Face Patch / Eye Markings
Using white yarn, embroider small semi-circles above the eyes (or use safety eyes with white eye patches). Attach safety eyes between Rounds 7 and 8, spaced 4 stitches apart.
Crochet the beak in orange yarn:
- Ch 6.
- Starting from 2nd ch from hook: sc, hdc, dc, hdc, sc.
- Fasten off, leaving tails to sew onto the face, centered below the eyes.
Add a small yellow tip to the beak tip for extra detail.
Step 3: Crochet the Body
Continue with black yarn.
- Round 1: Magic ring, 6 sc into ring. (6)
- Round 2: Inc in each st. (12)
- Round 3: [Sc, inc] x6. (18)
- Round 4: [Sc in next 2 st, inc] x6. (24)
- Round 5: Sc in each st. (24)
- Round 6: [Sc in next 3 st, inc] x6. (30)
- Rounds 7–12: Sc in each st. (30) – this is the widest part of the body.
- Round 13: [Sc in next 3 st, dec] x6. (24)
- Round 14: [Sc in next 2 st, dec] x6. (18)
- Round 15: [Sc, dec] x6. (12)
- Round 16: Dec around. (6)
- Fasten off, stuff firmly before closing.
Step 4: Crochet the Arms (x2)
Using black yarn:
- Round 1: Magic ring, 6 sc into ring. (6)
- Round 2: Inc in each st. (12)
- Rounds 3–6: Sc in each st. (12)
- Fasten off, leaving a tail. Flatten slightly and sew to the sides of the body, just below the head.
Step 5: Crochet the Legs (x2)
Using black yarn:
- Round 1: Magic ring, 6 sc into ring. (6)
- Round 2: Inc in each st. (12)
- Rounds 3–5: Sc in each st. (12)
- Fasten off. Sew to the bottom of the body, spacing evenly.
Step 6: Special Features Unique to the Toucan
To finish your Toucan’s tropical look:
- Chest Patch: Using yellow yarn, embroider a small triangle or crescent on the chest (between the wings).
- Tail: Crochet 6–8 small black “feathers” (triangles or teardrops) and sew to the back of the body.
- Wing Accents (optional): Add a few blue chain stitches or surface slip stitches for wing details.
Step 7: Assembly
- Attach the head to the top of the body using the yarn tails. Sew securely.
- Sew the beak onto the face, centered below the eyes.
- Attach the arms and legs with tails, positioning them symmetrically.
- Weave in all ends using a yarn needle.
- Give your Toucan a final stuffing adjustment if needed.
Crochet Graphic (Toucan Body)
Here’s a simple ASCII representation of the Toucan’s body shape. Imagine this as the silhouette when viewed from the side.
● ● ● ● ● ● ● ● ● ● ● ●
Legend:
| Symbol | Meaning |
|---|---|
| ● | Slip Stitch (start/end) |
| x | Single Crochet |
| V | Increase (2 sc in 1 st) |
| A | Decrease (sc2tog) |
| O | Chain |
This shape reflects the Toucan’s rounded body tapering at the top (head) and bottom (legs), with a slight bulge in the middle.
Finished Measurements
| Measurement | Size |
|---|---|
| Height | ~10 inches (25 cm) |
| Width (at widest point) | ~6 inches (15 cm) |
| Skill Level | Beginner |
Creative Uses for Your Crochet Toucan
Your handmade Toucan isn’t just a toy — it’s a versatile decor piece and gift!
- Baby Shower Gift: Pair with a crocheted jungle-themed blanket or book.
- Nursery Decoration: Hang from a mobile or place on a shelf for a tropical touch.
- Etsy Product: Turn your skills into income by listing on Etsy crochet shop guide.
- Birthday Present: Add a personalized tag: “Toucan’t resist hugging you!”
- Holiday Ornament: Attach a loop and hang on your Christmas tree as a quirky, handmade decoration.
- Photo Prop: Use in themed photo shoots or as a cute background character.
Common Mistakes to Avoid
- Over-stuffing: Can distort stitches and make assembly difficult. Stuff firmly but not tightly.
- Inconsistent tension: Leads to gaps or puckering. Practice maintaining even stitches before starting.
- Skipping the stitch marker: Easy to lose track of rounds, especially in the head. Always mark Round 1.
- Ignoring safety eyes: Small parts are choking hazards for babies. Opt for embroidered eyes if gifting to infants.
- Rushing assembly: Take time to align parts symmetrically — crooked arms or legs ruin the charm!
Tips for Maximizing Results
- Use a stitch counter app to track rounds accurately, especially when distracted.
- Block your pieces lightly before assembly — steam or wet-block to shape curves.
- Wax your yarn needle to help it glide through stitches when weaving in ends.
- Try a stitch marker with a bell — it jingles when you turn the work, keeping you aware of rounds.
- Keep a small pair of scissors handy to trim ends as you go, preventing bulk.
- Practice the magic ring before starting — it’s the best way to begin amigurumi without holes.
Conclusion
You now have everything you need to crochet an adorable, handmade Toucan! This easy amigurumi pattern delivers a charming plushie that’s perfect for beginners, thoughtful gifts, or playful home decor. With clear instructions, a free downloadable guide, and room for your own creative touches, your Toucan will be the star of any craft project.
Ready to start stitching? Download your free pattern and begin crocheting your Tou