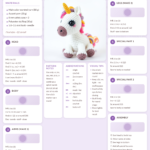
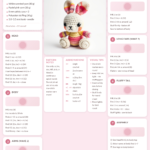
Why a Crochet Swan Makes the Perfect Handmade Treasure
Have you ever wondered how a few simple stitches could transform yarn into a graceful swan that looks like it’s gliding across a pond? Whether you’re a beginner or an experienced crocheter, this crochet swan pattern is your gateway to creating a handmade stuffed swan toy that’s as elegant as it is charming. This easy amigurumi swan is perfect for gifting, nursery decor, or adding a touch of handmade beauty to your home. With just a little yarn and a crochet hook, you can bring this graceful bird to life in no time.
Amigurumi, the Japanese art of knitting or crocheting small stuffed yarn creatures, has taken the crafting world by storm—and for good reason. These cute crochet animals are not only adorable but also incredibly satisfying to make. This crochet swan pattern is beginner-friendly, so even if you’re new to amigurumi, you’ll find it easy to follow along and create a beautiful finished product. Whether you’re looking to make a unique gift, a cozy nursery decoration, or a new addition to your crochet collection, this pattern is sure to impress.
Why You Will Love This crochet
- Trending and Timeless: Swans are symbols of grace and beauty, making them a popular choice for handmade swans and decor that never goes out of style.
- Beginner-Friendly: This pattern uses basic crochet stitches and simple techniques, perfect for those just starting with amigurumi.
- Great Gift Idea: A handmade crochet swan makes a heartfelt and personalized gift for birthdays, baby showers, or holidays.
- Nursery Decor: Add a touch of elegance to a baby’s room with a soft, plush yarn swan that’s safe and cuddly.
- Popular on Etsy: Handmade crochet swans are highly sought after, making this a great pattern to sell if you’re crafting for profit.
- Cute and Customizable: Change up the colors or add details like a beak or wings to make your swan uniquely yours!
Materials and Tools You Need
To get started on your crochet swan pattern, gather the following materials and tools:
Yarn Colors and Uses
| Part | Yarn Color | Yarn Type | Amount Needed |
|---|---|---|---|
| Body | White | Worsted weight cotton or acrylic | 100g |
| Beak | Orange | Worsted weight cotton | Small amount |
| Eyes | Black | Embroidery floss or safety eyes | 2 small eyes or embroidery thread |
| Accents | Gray or Light Blue | Worsted weight cotton | Small amount |
Supplies Checklist
- Crochet Hook: 3.5mm (E/4) or size recommended for your yarn
- Fiberfill Stuffing: Polyester stuffing for a soft, plush feel
- Safety Eyes: 6mm or embroidery thread for eyes
- Yarn Needle: For sewing parts together and weaving in ends
- Scissors: Sharp scissors for cutting yarn
- Stitch Markers: To mark the beginning of rounds
Cotton vs. Acrylic Yarn for Amigurumi
Both cotton and acrylic yarns work well for amigurumi, but they have different characteristics:
| Yarn Type | Pros | Cons |
|---|---|---|
| Cotton Yarn | Holds its shape well, durable, and breathable | Can be less stretchy, may split when worked |
| Acrylic Yarn | Soft, stretchy, and widely available in colors | Less durable, may pill over time |
For this easy amigurumi swan, cotton yarn is recommended for its durability and crisp stitch definition, but acrylic works well if you prefer a softer, plushier finish.
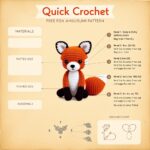
Step-by-Step Swan Crochet Pattern
Follow these step-by-step instructions to crochet your own elegant swan. Each step includes the stitch count to ensure your swan turns out just right!
Step 1: Crochet the Head
Start with a magic ring and work in continuous rounds.
- Round 1: 6 sc into magic ring. (6)
- Round 2: Inc in each stitch around. (12)
- Round 3: (Sc in next stitch, inc in next stitch) around. (18)
- Round 4: Sc in next 2 stitches, inc in next stitch, repeat around. (24)
- Rounds 5-7: Sc in each stitch around. (24)
- Round 8: (Sc in next 3 stitches, dec) around. (18)
- Round 9: Sc in next 2 stitches, dec, repeat around. (12)
- Round 10: Dec around. (6)
- Fasten off: Leave a tail for sewing. Stuff the head lightly before closing.
Step 2: Add Face Patch / Eye Markings
If using embroidery for eyes, embroider two small black circles on the head using black embroidery floss. For safety eyes, attach them after stuffing the head.
Step 3: Crochet the Body
Begin with a magic ring and work in continuous rounds.
- Round 1: 6 sc into magic ring. (6)
- Round 2: Inc in each stitch around. (12)
- Round 3: (Sc in next stitch, inc in next stitch) around. (18)
- Round 4: Sc in next 2 stitches, inc in next stitch, repeat around. (24)
- Rounds 5-10: Sc in each stitch around. (24)
- Round 11: (Sc in next 3 stitches, dec) around. (18)
- Round 12: Sc in next 2 stitches, dec, repeat around. (12)
- Round 13: Dec around. (6)
- Fasten off: Leave a tail for sewing. Stuff the body firmly before closing.
Step 4: Crochet the Arms
Make 2 arms.
- Chain 6: Starting with a slip knot, chain 6.
- Row 1: Starting in the second chain from the hook, sc in each stitch across. (5)
- Rows 2-4: Ch 1, turn, sc in each stitch across. (5)
- Fasten off: Leave a tail for sewing. Flatten the piece slightly before attaching.
Step 5: Crochet the Legs
Make 2 legs.
- Round 1: 6 sc into magic ring. (6)
- Round 2: Inc in each stitch around. (12)
- Rounds 3-5: Sc in each stitch around. (12)
- Fasten off: Leave a tail for sewing. Stuff lightly before attaching.
Step 6: Special Features Unique to the Swan
Add a small orange beak by crocheting a tiny triangle or embroidering one onto the face. For wings, you can crochet two small oval shapes or leave them off for a minimalist look.
Step 7: Assembly
- Sew the head to the top of the body using the tail from the head.
- Attach the arms to the sides of the body, positioning them slightly forward for a natural look.
- Sew the legs to the bottom of the body, spacing them evenly apart.
- Weave in all ends securely.
- Add safety eyes or embroidered eyes after assembly if not already done.
Crochet Graphic (Swan Body)
The following ASCII graphic represents the basic shape and stitch pattern for the swan’s body. Use this as a visual guide while crocheting.
● OOO x x x x x x x x x x x x x x x A V A V V x x ●
Legend:
| Symbol | Stitch |
| x | Single Crochet (sc) |
| V | Increase (inc) |
| A | Decrease (dec) |
| O | Chain (ch) |
| ● | Slip Stitch (sl st) |
Finished Measurements
| Measurement | Size |
|---|---|
| Height | 12 inches (30 cm) |
| Width (at widest point) | 8 inches (20 cm) |
| Skill Level | Beginner |
Creative Uses for Your Crochet Swan
- Baby Shower Gift: A handmade swan is a thoughtful and unique present for a new baby or parent-to-be.
- Nursery Decoration: Place your swan in a crib, on a shelf, or as part of a mobile for a whimsical touch.
- Etsy Product: Sell your crocheted swans on platforms like Etsy for a profitable handmade business.
- Birthday Present: Ideal for animal lovers or anyone who appreciates handmade crafts.
- Holiday Ornament: Decorate your Christmas tree with mini swans or use them as part of a holiday display.
Common Mistakes to Avoid
- Overstuffing: Stuff your swan firmly but not too tightly, as this can distort the shape and make sewing difficult.
- Inconsistent Tension: Keep your stitches even to maintain a professional look. Practice on a swatch first if you’re new to amigurumi.
- Skipping Stitch Markers: Use stitch markers to mark the beginning of each round—this helps keep your work aligned and prevents mistakes.
- Ignoring Finishing Touches: Weave in ends securely and sew parts together neatly to ensure your swan looks polished.
- Using the Wrong Hook Size: Check your yarn label for the recommended hook size to achieve the correct gauge.
Tips for Maximizing Results
- Use a Stitch Counter: Keep track of your stitches, especially during increases and decreases, to maintain symmetry.
- Block Your Pieces: Lightly steam or wet block your finished swan pieces before assembly to ensure they lie flat and look tidy.
- Experiment with Colors: Swans aren’t just white! Try pastel shades for a spring-themed look or gray for a modern twist.
- Add Personality: Embroider eyelashes, rosy cheeks, or a cute bow to give your swan extra charm.
- Practice on a Swatch: If you’re new to amigurumi, practice the basic stitches on a small swatch before starting your swan.
Conclusion
With this free crochet swan pattern, you’re just a few hours away from creating a stunning handmade amigurumi swan that’s perfect for gifting, decorating, or adding to your craft collection. Whether you’re a beginner or an experienced crocheter, this easy amigurumi pattern is designed to be accessible and enjoyable for all skill levels. Follow the step-by-step instructions, use the provided crochet graphic as a guide, and don’t forget to share your finished swan on social media with the hashtag #CrochetSwan!
Download the free pattern and start crocheting your Swan today! Happy crafting!
Frequently Asked Questions
- Is this swan pattern suitable for absolute beginners?
Yes! This pattern uses basic stitches like single crochet and simple increases/decreases, making it perfect for beginners. If you’re new to amigurumi, practice on a small project first.
- Can I use different yarn weights?
You can use worsted weight yarn as recommended, but thinner yarn will result in a smaller swan, and bulkier yarn will make a larger one. Adjust your hook size accordingly.
- How do I change the color of my swan?
To