Adorable Panda Crochet Pattern – Easy Amigurumi Panda
Meta Title: Adorable Panda Crochet Pattern – Easy Amigurumi Panda | Focus Keyword: panda crochet
Introduction
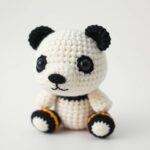
Have you ever wanted to create the cutest crochet animal that doubles as a huggable plushie and a charming home decor piece? Meet your new favorite project: the panda crochet pattern. This adorable amigurumi panda is beginner-friendly, perfect for gifting, and ideal for adding a touch of whimsy to nurseries and living spaces.
Amigurumi, the Japanese art of knitting or crocheting stuffed yarn creatures, has taken the crafting world by storm. With its simple stitches and endless customization options, it’s no wonder that crochet animal patterns like this panda are so popular. Whether you’re a seasoned crocheter or just starting out, this pattern will guide you through creating your very own cuddly panda in no time.
Why You Will Love This Panda Crochet Pattern
- Trending and Adorable: Pandas are universally loved, making this pattern a hit for both crocheters and recipients.
- Beginner-Friendly: Designed with simple stitches and clear instructions, perfect for those new to amigurumi.
- Great Gift Idea: Handmade panders make heartfelt presents for birthdays, baby showers, or holidays.
- Nursery Decor: Add a cozy touch to a baby’s room with this cute and cuddly plushie.
- Etsy-Friendly: Create a popular product for your Etsy shop with this in-demand pattern.
- Customizable: Use different yarn colors to personalize your panda’s features.
Materials and Tools You Need
Before you start, gather your supplies to ensure a smooth crocheting experience. Here’s what you’ll need:
Yarn Colors and Their Uses
- White Yarn: Main body of the panda.
- Black Yarn: Eye patches, ears, and limbs.
- Optional Accent Colors: Pink yarn for cheeks or other creative touches.
Supplies Checklist
- Crochet Hook: Size 2.5mm to 3.5mm (adjust based on yarn weight).
- Safety Eyes: 6mm to 8mm (or embroider eyes for a classic look).
- Fiberfill Stuffing: Polyester or cotton stuffing for a plush finish.
- Stitch Marker: To mark your starting point.
- Yarn Needle: For sewing parts together.
- Scissors: For trimming yarn.
- Fabric Glue (optional): To secure safety eyes.
Yarn Comparison Table for Amigurumi
| Yarn Type | Pros | Cons | Best For |
|---|---|---|---|
| Cotton Yarn | Durable, holds shape well, breathable | Less stretchy, can be stiff | Structured amigurumi like this panda |
| Acrylic Yarn | Affordable, soft, widely available | Less breathable, can pill over time | Budget-friendly projects |
For this pattern, cotton yarn is recommended for a crisp, professional finish. However, acrylic yarn works well for beginners or practice rounds.
Step-by-Step Panda Crochet Pattern
Follow these instructions carefully to create your adorable panda. Each step includes stitch counts to ensure accuracy.
Step 1: Crochet the Head
Start with the head, which is worked in a spiral (continuous rounds without joining).
- Round 1: Magic ring, 6 sc into ring. (6)
- Round 2: 2 sc in each stitch around. (12)
- Round 3: *Sc in next stitch, 2 sc in next stitch*; repeat from * to * around. (18)
- Round 4: Sc in next 2 stitches, 2 sc in next stitch; repeat from * to * around. (24)
- Rounds 5-8: Sc in each stitch around. (24)
- Round 9: *Sc in next 2 stitches, sc2tog*; repeat from * to * around. (18)
- Rounds 10-11: Sc in each stitch around. (18)
- Round 12: *Sc in next stitch, sc2tog*; repeat from * to * around. (12)
- Round 13: Sc2tog around. (6)
Fasten off and leave a long tail for sewing.
Step 2: Add Eye Patches
Using black yarn, embroider or sew the classic panda eye patches. Position them about 3-4 rounds from the top of the head. Alternatively, attach safety eyes before stuffing the head.
Step 3: Crochet the Body
Work the body in the same spiral method as the head.
- Round 1: Magic ring, 6 sc into ring. (6)
- Round 2: 2 sc in each stitch around. (12)
- Round 3: *Sc in next stitch, 2 sc in next stitch*; repeat from * to * around. (18)
- Round 4: Sc in next 2 stitches, 2 sc in next stitch; repeat from * to * around. (24)
- Rounds 5-10: Sc in each stitch around. (24)
- Round 11: *Sc in next 2 stitches, sc2tog*; repeat from * to * around. (18)
- Round 12: *Sc in next stitch, sc2tog*; repeat from * to * around. (12)
- Round 13: Sc2tog around. (6)
Fasten off and stuff the body firmly with fiberfill.
Step 4: Crochet the Arms (2 pieces)
Make two arms to attach to the body.
- Round 1: Magic ring, 6 sc into ring. (6)
- Round 2: 2 sc in each stitch around. (12)
- Rounds 3-5: Sc in each stitch around. (12)
- Round 6: Sc in next 3 stitches, sc2tog; repeat from * to * once. (10)
- Rounds 7-8: Sc in each stitch around. (10)
- Fasten off and leave a tail for sewing.
Step 5: Crochet the Legs (2 pieces)
Make two legs, slightly larger than the arms.
- Round 1: Magic ring, 6 sc into ring. (6)
- Round 2: 2 sc in each stitch around. (12)
- Rounds 3-7: Sc in each stitch around. (12)
- Round 8: Sc in next 3 stitches, sc2tog; repeat from * to * once. (10)
- Rounds 9-10: Sc in each stitch around. (10)
- Fasten off and leave a tail for sewing.
Step 6: Special Panda Features
Add the following details to bring your panda to life:
- Ears: Make two small circles (6 sc rounds) and sew them to the top of the head.
- Arms and Legs: Attach the arms to the sides of the body and the legs to the bottom.
- Optional Cheeks: Use pink yarn to embroider rosy cheeks on either side of the nose.
Step 7: Assembly
Follow these steps to assemble your panda:
- Stuff the head and body firmly but don’t overstuff.
- Sew the safety eyes or embroider the eyes between Rounds 6-8 of the head.
- Attach the ears to the top of the head using the yarn tails.
- Sew the arms to the sides of the body, positioning them evenly.
- Sew the legs to the bottom of the body, ensuring stability.
- Use black yarn to embroider the distinctive panda nose and mouth between the eyes.
Crochet Graphic (Panda Body)
Below is an ASCII representation of the panda’s body shape. Use this as a guide for your stitch placement.
● O O O O O O ● O x x x x x x x x x O O x x x x x x x x x x x O O x x x A A A A A A x x x O O x x A V V V V V A x x x O O x x A V x x x V A x x x O O x x A V x x x V A x x x O O x x A V V V V V A x x x O O x x x A A A A A A x x x O O x x x x x x x x x x x O O x x x x x x x x x O ● O O O O O O ●
Legend:
| Symbol | Stitch |
|---|---|
| x | Single Crochet (sc) |
| V | Increase (2 sc in next stitch) |
| A | Decrease (sc2tog) |
| O | Chain (ch) |
| ● | Slip Stitch (sl st) |
Finished Measurements
The finished panda measures approximately:
| Measurement | Size |
|---|---|
| Height | About 8 inches (20 cm) |
| Width | About 5 inches (13 cm) |
| Skill Level | Beginner to Intermediate |
Creative Uses for Your Crochet Panda
Your handmade panda is more than just a toy—it’s a versatile addition to your home or a thoughtful gift. Here are some creative ways to use it:
- Baby Shower Gift: A soft, huggable panda is perfect for welcoming a new baby.
- Nursery Decoration: Place your panda on a shelf or crib for a charming touch.
- Etsy Product: Sell your pandas as handmade plushies or kits for other crafters.
- Birthday Present: Customize the panda’s colors to match the recipient’s favorite palette.
- Holiday Ornament: Attach a ribbon to hang your panda as a festive decoration.
Common Mistakes to Avoid
Even the simplest patterns can have pitfalls. Here’s what to watch out for:
- Overstuffing: Too much stuffing can distort the shape. Stuff firmly but evenly.
- Inconsistent Tension: Keep your stitches tight but not too tight to avoid puckering.
- Skipping Stitch Markers: Use stitch markers to track your progress, especially in the early rounds.
- Ignoring Safety Eyes: If using safety eyes, insert them before closing the head completely.
- Rushing Assembly: Take your time sewing parts together for a neat finish.
Tips for Maximizing Results
Follow these tips to ensure your panda turns out as adorable as possible:
- Use a Stitch Guide: A crochet stitch guide can help you master the basics.
- Block Your Work: Gently steam or wet-block your panda to shape it perfectly.
- Experiment with Yarn: Try different textures or colors to create unique pandas.
- Practice Increases and Decreases: These techniques are key to shaping your amigurumi.
- Watch Tutorials: Visual learners can benefit from YouTube crochet tutorials.
Conclusion
The panda crochet pattern is a delightful project that combines creativity and relaxation. Whether you’re making it as a gift, a decor piece, or just for fun, this adorable amigurumi will bring joy to anyone who sees it. With clear instructions and customizable options, it’s perfect for crocheters of all skill levels.
Ready to start crocheting? Download the free pattern and let your creativity soar!