Introduction
Have you ever dreamed of bringing the magic of the ocean into your crochet projects? What if you could create your very own adorable narwhal with just a ball of yarn and a hook? This easy amigurumi Narwhal crochet pattern is the perfect project for crocheters of all skill levels who want to make a charming stuffed Narwhal toy. Whether you’re a beginner looking for your first amigurumi or an experienced crafter wanting to add a whimsical piece to your collection, this pattern is designed to deliver a delightful result with minimal frustration.
Narwhals aren’t just mythical sea creatures—they’re also incredibly cute when transformed into crochet plushies! This free crochet animal pattern is ideal for handmade gifts, nursery decor, or simply adding a touch of oceanic wonder to your home. Plus, with our detailed instructions and tips, you’ll master the art of crocheting this unique animal in no time. Ready to dive in? Let’s get started!
Why You Will Love This crochet
- Perfect for Beginners: This easy amigurumi Narwhal crochet pattern uses basic stitches and simple techniques, making it ideal for new crocheters.
- Trending Design: Handmade Narwhal plushies are a hot trend in the crochet world, especially for kids’ rooms and themed baby showers.
- Great Gift Idea: A crocheted narwhal makes a unique, personalized present for birthdays, holidays, or baby showers.
- Nursery Decor: Add a touch of ocean magic to any nursery with this adorable stuffed Narwhal toy.
- Popular on Etsy: Many crocheters sell this pattern on Etsy—imagine turning your hobby into side income!
- Cute Design: With its long spiral tusk and playful expression, this narwhal is sure to capture hearts.
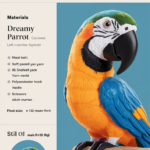
Materials and Tools You Need
Before you start your crochet narwhal, gather these essentials:
Yarn Colors and Uses
- Body: Light blue or grey yarn (main color)
- Belly: White yarn
- Mouth: Pink yarn
- Tusk: White or cream yarn (for the signature spiral)
- Eye Markings: Black yarn (for a cute face)
Supplies Checklist
- Crochet hook: 2.5mm (C/2) or 3.0mm (D/3) for most amigurumi
- Safety eyes: 6mm or 9mm (optional; you can crochet eyes instead)
- Fiberfill stuffing
- Stitch marker (to mark rounds)
- Yarn needle (for sewing pieces together)
- Scissors
Cotton vs Acrylic Yarn for Amigurumi
| Feature | Cotton Yarn | Acrylic Yarn |
|---|---|---|
| Durability | Firm stitches, holds shape well | Softer, more flexible |
| Texture | Smooth, less stretchy | Fluffy, slightly stretchy |
| Washability | Machine washable, durable | Machine washable, prone to pilling |
| Best For | Amigurumi needing structure | Soft, cuddly plushies |
For this narwhal, we recommend using 100% cotton yarn for a firm structure, especially if the toy will be handled by children.
Step-by-Step Narwhal Crochet Pattern
Step 1: Crochet the Head
Start with the magic ring (adjustable ring).
- Round 1: 6 sc in ring. (6)
- Round 2: Inc in each st. (12)
- Round 3: [Sc in next st, inc in next st] around. (18)
- Round 4: [Sc in next 2 sts, inc in next st] around. (24)
- Round 5: [Sc in next 3 sts, inc in next st] around. (30)
- Round 6–8: Sc in each st. (30)
- Round 9: [Sc in next 3 sts, dec] around. (24)
- Round 10: [Sc in next 2 sts, dec] around. (18)
- Round 11: [Sc in next st, dec] around. (12)
- Round 12: Dec around. (6)
- Fasten off, leaving a tail for sewing.
Step 2: Add Face Patch / Eye Markings
Using black yarn, embroider small triangles for eyes or use safety eyes. Add a pink yarn line for the mouth.
Step 3: Crochet the Body
- Round 1: 6 sc in ring. (6)
- Round 2: Inc in each st. (12)
- Round 3: [Sc in next st, inc in next st] around. (18)
- Round 4: [Sc in next 2 sts, inc in next st] around. (24)
- Round 5: [Sc in next 3 sts, inc in next st] around. (30)
- Round 6–12: Sc in each st. (30) – body widens in the middle
- Round 13: [Sc in next 3 sts, dec] around. (24)
- Round 14: [Sc in next 2 sts, dec] around. (18)
- Round 15: [Sc in next st, dec] around. (12)
- Round 16: Dec around. (6)
- Fasten off, leaving a tail.
Step 4: Crochet the Arms (2 pieces)
- Chain 6.
- Starting in second chain from hook: sc in each st across. (5)
- Chain 1, turn; sc in each st. (5)
- Repeat for 5 more rows.
- Fold and sew the short ends together to form a tube. Leave open at top to stuff lightly.
- Make 2 arms.
Step 5: Crochet the Legs (2 pieces)
- Chain 5.
- Starting in second chain from hook: sc in each st across. (4)
- Chain 1, turn; sc in each st. (4)
- Repeat for 4 more rows.
- Fold and sew the short ends together.
- Make 2 legs.
Step 6: Special Features Unique to the Narwhal
The Tusk
- Chain 15.
- Starting in second chain from hook: sc in each st across. (14)
- Chain 1, turn; sc in each st. (14)
- Repeat for 10 more rows.
- Cut yarn, leaving a long tail. Roll the strip tightly from one end to form a spiral tusk.
- Sew the tusk to the center of the head using white yarn.
Belly Markings (Optional)
Use white yarn to embroider a small crescent shape on the belly for a realistic touch.
Step 7: Assembly
- Stuff the head and body firmly with fiberfill.
- Sew the head to the top of the body using the yarn tail.
- Attach the arms to the sides of the body, slightly angled downward.
- Attach the legs to the bottom, spaced evenly.
- Weave in all ends securely.
Crochet Graphic (Narwhal Body)
● / \ x x / \ x x x x / x \ x x x x x \ x / x x x x \ / x x \ / ●
Legend:
| Symbol | Meaning |
| x | Single Crochet (sc) |
| V | Increase (inc) |
| A | Decrease (dec) |
| O | Chain (ch) |
| ● | Slip Stitch (sl st) |
Finished Measurements
| Measurement | Size |
|---|---|
| Height | Approximately 8 inches (20 cm) |
| Width (at widest point) | About 5 inches (13 cm) |
| Skill Level | Beginner |
Creative Uses for Your Crochet Narwhal
- Baby Shower Gift: Pair your narwhal with a crocheted blanket or mobile for a magical nursery set.
- Nursery Decoration: Hang it from the crib or shelf for a whimsical touch.
- Etsy Product: Turn your hobby into income by selling these on Etsy.
- Birthday Present: Perfect for a child who loves ocean animals.
- Holiday Ornament: Add a loop and hang it on the tree as a nautical-themed decoration.
Common Mistakes to Avoid
- Skipping the Stitch Marker: Always mark the beginning of each round to avoid losing your place.
- Overstuffing: Too much fiberfill can distort the shape of your narwhal.
- Inconsistent Tension: Keep your stitches tight and even for a professional look.
- Forgetting to Weave in Ends: Unsecured ends can unravel over time.
- Using the Wrong Yarn: Avoid stretchy or fuzzy yarns for amigurumi—they won’t hold shape well.
Tips for Maximizing Results
- Use a Stitch Counter: Helps track rounds and increases accurately.
- Block Your Pieces: Lightly steam or wet block your finished parts to even out stitches.
- Choose Contrasting Colors for Edging: Helps define the narwhal’s belly and face.
- Practice Increases and Decreases: Do a few swatches before starting to ensure smooth transitions.
- Add a Loop for Hanging: If using as decor, add a chain loop at the top before closing the head.
Conclusion
Creating your own adorable narwhal crochet pattern is a fun and rewarding project that brings a piece of oceanic magic into your hands. Whether you’re crocheting for a gift, a nursery, or just for joy, this easy amigurumi Narwhal is sure to delight. With our step-by-step guide, you’ll have a cute stuffed Narwhal toy ready in no time!
Ready to dive in? Download the free pattern and start crocheting your Narwhal today! Share your creations online with #CrochetNarwhal and tag us—we’d love to see your underwater masterpiece!
Frequently Asked Questions
- Can I make this Narwhal with bulky yarn?
Yes, but use a larger hook (e.g., 4.0mm or 5.0mm) and adjust stitch counts proportionally. Expect a larger finished size.
- How do I adjust the size of the Narwhal?
Change your hook size or yarn weight. For a bigger narwhal, use a thicker yarn and larger hook. For a smaller one, use finer yarn and a smaller hook.
- Can I sell narwhals made from this pattern?
Yes! We encourage small businesses. However, please credit the pattern and do not sell the pattern itself.
- What’s the best stitch for a tight amigurumi fabric?
Use single crochet (sc) and work in continuous rounds. Avoid turning at the end of rows.
- Do I have to use safety eyes?
No! You can embroider eyes using black yarn for a handmade, vintage look.
- How long does it take to crochet a Narwhal?
About 4–6 hours for a beginner, less for experienced crocheters.
- Can I add a bow or ribbon to the Narwhal?
Absolutely! A small crocheted bow or satin ribbon around the neck adds a charming detail.