Beginner Crochet Blanket Patterns – Easy Free Patterns
Have you ever wanted to create a handmade blanket that’s both stylish and snuggly—but don’t know where to start? Whether you’re a beginner or a seasoned crocheter looking for a quick project, the beginner crochet blanket patterns in this guide are perfect for you. From modern textures to classic granny squares, these patterns are beginner-friendly, budget-conscious, and endlessly customizable. Plus, they make thoughtful gifts for birthdays, baby showers, or just because!
In this post, you’ll find everything you need to choose, start, and finish your first (or next) crochet blanket—including free patterns, material lists, and step-by-step instructions. Let’s get your hook warmed up!
Why You Will Love This beginner crochet blanket patterns
- Perfect for beginners: Simple stitches and clear instructions make these patterns accessible to new crocheters.
- Trending designs: From chunky knit styles to breezy summer blankets, there’s a look for every season and taste.
- Great for gifting: Handmade blankets are heartfelt gifts that show time, love, and effort.
- Nursery decor: Soft pastels and gender-neutral tones fit beautifully in any baby’s room.
- Popular on Etsy: Many of these free patterns are inspired by best-selling crochet sellers.
- Cuddle-ready: Made with cozy yarns, your finished blanket will be irresistibly warm.
Ready to dive in? Let’s go!
Materials and Tools You Need
Before you start your beginner crochet blanket, gather these essentials:
- Yarn: Medium weight (worsted, #4) in your chosen color— acrylic is affordable, cotton is breathable, and wool is ultra-warm.
- Crochet hook: 5.5mm (I-9) for worsted weight yarn; adjust size based on your tension.
- Scissors and yarn needle for weaving in ends.
- Stitch markers: Helpful for counting rows or marking the start of a round.
- Measuring tape: To check gauge and finished size.
Yarn Type Comparison Table
| Yarn Type | Pros | Cons | Best For |
|---|---|---|---|
| Acrylic (e.g., Red Heart Super Saver) | Budget-friendly, widely available, easy to care for | Less breathable, can pill over time | Everyday blankets, gifts, beginners |
| Cotton (e.g., Lily Sugar ‘n Cream) | Breathable, sturdy, great stitch definition | Less stretchy, can feel stiff | Summer throws, dishcloths, market bags |
| Wool or Wool Blend | Warm, durable, beautiful drape | Expensive, requires washing care | Winter blankets, heirloom pieces |
| Bamboo or Silk Blend | Soft, eco-friendly, silky feel | Expensive, less durable | Luxury throws, baby blankets |
Yarn Standards Guide – Craft Yarn Council(https://www.craftyarncouncil.com/) for choosing the right yarn weight and hook size.
Step-by-Step Panda Crochet Pattern – Amigurumi Style
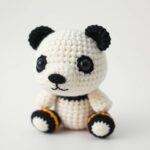
Looking for something cuddly beyond a blanket? This adorable Amigurumi Panda crochet pattern is perfect for beginners who want to try stuffed animals. With clear rounds and simple stitches, you’ll create a huggable panda that’s both fun to make and gift!
Let’s break it down step by step. You’ll need:
- Black yarn (for patches and details)
- White yarn (main color)
- 5mm (H-8) crochet hook
- 12mm safety eyes
- Fiberfill stuffing
- Yarn needle & scissors
Step 1: Crochet the Head
- Start with a magic ring.
- Round 1: 6 sc in ring. (6)
- Round 2: 2 sc in each st. (12)
- Round 3: (sc in next st, 2 sc in next st) x6. (18)
- Round 4: (sc in next 2 sts, 2 sc in next st) x6. (24)
- Rounds 5–8: sc in each st. (24)
- Round 9: (sc in next 2 sts, sc2tog) x6. (18)
- Stuff firmly.
- Round 10: (sc in next st, sc2tog) x6. (12)
- Round 11: sc2tog x6. (6)
- Fasten off, weave in ends.
Step 2: Face Patch / Eye Markings
- Using black yarn, embroider two large ovals for eye patches, centered around the safety eyes.
- Place safety eyes between rounds 6–7, about 4 stitches apart.
- Embroider a small black nose below the eyes using a short straight stitch.
Step 3: Crochet the Body
- Start with a magic ring.
- Round 1: 6 sc in ring. (6)
- Round 2: 2 sc in each st. (12)
- Round 3: (sc in next st, 2 sc in next st) x6. (18)
- Round 4: (sc in next 2 sts, 2 sc in next st) x6. (24)
- Rounds 5–12: sc in each st. (24)
- Round 13: (sc in next 2 sts, sc2tog) x6. (18)
- Stuff firmly.
- Round 14: (sc in next st, sc2tog) x6. (12)
- Round 15: sc2tog x6. (6)
- Fasten off, leave a long tail for sewing.
Step 4: Crochet the Arms (make 2)
- Start with a magic ring.
- Round 1: 6 sc in ring. (6)
- Round 2: 2 sc in each st. (12)
- Rounds 3–5: sc in each st. (12)
- Round 6: sc in each st while decreasing evenly to 6 sts. (6)
- Fasten off, leave tail for sewing.
Step 5: Crochet the Legs (make 2)
- Same as arms, but work Rounds 1–6.
- Round 7: sc in each st while decreasing to 4 sts. (4)
- Fasten off, leave tail.
Step 6: Special Features Unique to the Panda
- Ears: Crochet two small ovals using white yarn (6 ch, sc in 2nd from hook, sc across, turn, ch1, sc across). Sew to top of head.
- Tail: Small ball (start with 4 sc, increase to 12, then decrease to close). Stuff lightly.
- Black markings: Embroider eye patches, nose, and small arcs on ears if desired.
Step 7: Assembly
- Sew head to top of body.
- Attach arms to sides, slightly forward.
- Attach legs to bottom, spaced evenly.
- Sew tail to back base.
- Weave in all ends securely.
Crochet Graphic: Panda Body
Use this ASCII chart to visualize the panda’s shape as you crochet:
● / \ / \ O O / \ x x / \ V V / \ A-----------------A / \ x x
Legend:
● = Slip Stitch (top of head)
O = Chain stitch (top loop)
x = Single Crochet
V = Increase (2 sc in 1 st)
A = Decrease (sc2tog)
Finished Measurements
| Measurement | Size |
|---|---|
| Height (from head to base) | 12 inches (30 cm) |
| Width (across body) | 8 inches (20 cm) |
| Skill Level | Beginner |
Creative Uses for Your Crochet Panda
- Perfect baby shower gift or nursery decoration
- Handmade plushie for kids’ rooms or playrooms
- Etsy listing – sell as “handmade Panda crochet plushie”
- Holiday ornament or stocking stuffer
- Photo prop for social media or branding
Common Mistakes to Avoid
- Overstuffing: Can distort shape—stuff firmly but not tightly.
- Inconsistent tension: Use a tension ring or adjust hook size to keep stitches even.
- Skipping stitch markers: Especially important in amigurumi to track rounds.
- Ignoring gauge: Even in amigurumi, matching the pattern’s stitch count ensures proportions.
- Using wrong yarn: Avoid fuzzy or textured yarns—they hide stitch details.
Tips for Maximizing Results
- Use stitch markers at the start of each round to avoid losing your place.
- Weave in ends as you go—prevents bulk and saves time at the end.
- Block your pieces lightly before assembly to shape them properly.
- Keep a tension guide nearby to maintain consistent stitch size.
- Try a lifeline: Thread a scrap yarn through a round before finishing to help fix mistakes.
Conclusion
You now have a complete, beginner-friendly Amigurumi Panda crochet pattern ready to bring to life! Whether you’re making it as a gift, a nursery decor piece, or just for fun, this cute panda is sure to be a hit. With easy-to-follow rounds and minimal materials, it’s the perfect project to build your confidence in amigurumi.
Ready to start? Download the free pattern, grab your yarn, and let’s crochet your very own cuddly panda today!
Frequently Asked Questions
- Can I make this panda bigger?
Yes! Start with a larger magic ring and increase rounds more slowly. For a 16-inch panda, begin with 8 sc in the magic ring and increase over 5–6 rounds.
- What if I don’t have safety eyes?
You can embroider eyes using black yarn instead. Just keep them symmetrical and about 3–4 stitches apart.
- Is acrylic yarn okay for amigurumi?
Yes! Acrylic is durable, affordable, and easy to care for—perfect for beginner plushies. Just avoid super bulky yarns for tight stitches.
- How do I prevent gaps in my stitches?
Make sure to pull the working yarn snugly after each stitch, but not too tight. A slightly looser tension helps maintain even rounds.
- Can I sell panda plushies made from this pattern?
Yes, but check local regulations and give credit if following a free pattern. Avoid using trademarked images or names.
- What’s the best way to wash a crochet panda?
Hand wash in cold water with mild soap, lay flat to dry. Avoid machine washing or bleach.
- Do I need to use a stitch marker?
Highly recommended! It marks the start of each round, especially helpful when counting increases and decreases.
beginner crochet patterns – more free guides | best yarn for amigurumi – top picks | how to read crochet patterns – beginner’s guide