Beginner Crochet Patterns Free: Easy Amigurumi Wolf Pattern
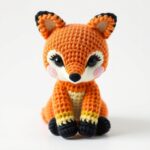
Ever wondered how to crochet a wolf that looks both adorable and lifelike? This beginner crochet patterns free Amigurumi Wolf pattern is your perfect project! Whether you’re crafting a gift for a loved one or adding to your crochet collection, this cute wolf is sure to impress. Let’s get started!
Why You Will Love This Beginner Crochet Patterns Free Amigurumi Wolf
- Trending Design: Amigurumi animals are all the rage on Etsy, Instagram, and Pinterest—this wolf fits right in!
- Beginner-Friendly: With simple stitches and clear instructions, even first-time crocheters can succeed.
- Perfect Gift Idea: Handmade crochet wolves make heartfelt presents for birthdays, baby showers, or holidays.
- Nursery Decor: Add a whimsical touch to a child’s room with this charming plushie.
- Etsy Bestseller Potential: This pattern is inspired by popular Etsy listings selling for $25–$40!
- Cute & Customizable: Change colors to match your decor or add unique markings for a personalized touch.
Materials and Tools You Need
Gather these supplies to start your crochet wolf project:
Yarn Colors
- Gray: Main body (worsted weight, #4, 100% acrylic or cotton)
- White: Belly and snout (worsted weight)
- Black: Ears, tail tip, and facial markings (worsted weight)
- Pink (optional): Inner ears and nose (worsted weight)
Supplies
- Crochet Hook: 3.5mm (E/4) or size recommended for your yarn
- Safety Eyes: 10mm (attach before stuffing the head)
- Fiberfill Stuffing: Polyester or cotton stuffing for a firm plush
- Stitch Marker: To mark your first stitch in rounds
- Yarn Needle: For weaving in ends
- Scissors: Sharp fabric scissors for clean cuts
Yarn Comparison Table
| Yarn Type | Pros | Cons | Best For |
|---|---|---|---|
| Cotton Yarn | Sturdy, holds shape well, eco-friendly | Less stretchy, can be harder on hands | Structured amigurumi like wolves |
| Acrylic Yarn | Soft, affordable, wide color range | Less durable, may pill over time | Beginner projects, gifts |
Step-by-Step Wolf Crochet Pattern
Step 1: Crochet the Head
Round 1: Magic ring, 6 sc into ring. (6)
Round 2: Inc in each st around. (12)
Round 3: [Sc in next st, inc] x6. (18)
Round 4: [Sc in next 2 st, inc] x6. (24)
Round 5: [Sc in next 3 st, inc] x6. (30)
Round 6–8: Sc in each st around. (30)
Round 9: [Sc in next 3 st, dec] x6. (24)
Round 10: [Sc in next 2 st, dec] x6. (18)
Round 11: [Sc in next st, dec] x6. (12)
Stuff firmly. Attach safety eyes between Rounds 6–7, 4 stitches apart.
Round 12: Dec around. (6)
Fasten off, leaving a tail for sewing. Flatten the head slightly.
Step 2: Face Patch / Eye Markings
Using black yarn, embroider a “V” shape between the eyes for a wolf-like expression. Add a small pink nose in the center.
Step 3: Crochet the Body
Round 1: Magic ring, 6 sc into ring. (6)
Round 2: Inc in each st around. (12)
Round 3: [Sc in next st, inc] x6. (18)
Round 4: Sc in each st around. (18)
Round 5: [Sc in next 2 st, inc] x6. (24)
Round 6–10: Sc in each st around. (24)
Round 11: [Sc in next 2 st, dec] x6. (18)
Round 12–13: Sc in each st around. (18)
Stuff firmly. Flatten the bottom slightly.
Round 14: [Sc in next st, dec] x6. (12)
Fasten off, leaving a tail for sewing.
Step 4: Crochet the Arms (x2)
Round 1: Magic ring, 6 sc into ring. (6)
Round 2: Inc in each st around. (12)
Round 3: Sc in each st around. (12)
Round 4: [Sc in next 2 st, dec] x3. (9)
Fasten off, leaving a long tail for sewing. Slightly stuff before attaching.
Step 5: Crochet the Legs (x2)
Round 1: Magic ring, 6 sc into ring. (6)
Round 2: Inc in each st around. (12)
Round 3: Sc in each st around. (12)
Round 4: [Sc in next st, dec] x4. (8)
Flatten the bottom slightly for a paw-like shape.
Fasten off, leaving a tail for sewing. Do not stuff.
Step 6: Special Features Unique to the Wolf
Ears (x2): Chain 6, sc in second chain from hook and each chain. Fasten off, leaving a tail. Sew to the top of the head.
Tail: Chain 12, sc in second chain from hook and each chain. Fasten off, leaving a tail. Attach to the back of the body.
Facial Markings: Using black yarn, embroider stripes along the cheeks and a dark line down the snout.
Step 7: Assembly
- Sew the head to the top of the body.
- Attach the arms to the sides of the body (around Round 7–8).
- Sew the legs to the bottom of the body (Round 10–11).
- Attach the ears to the top of the head.
- Sew the tail to the back of the body.
- Weave in all ends securely.
Crochet Graphic: Wolf Body Shape
Below is an ASCII chart representing the shape of the wolf’s body in crochet rounds. Use this as a visual guide while working through the pattern.
● ● ● ● ● ● ● V V V ● ● O O O O O ● ● x x x x x ● ● x x x x x ● ● O O O O O ● ● A A A ● ● ● ● ● ● ●
Legend:
| Symbol | Meaning |
x |
Single Crochet (sc) |
V |
Increase (inc) |
A |
Decrease (dec) |
O |
Chain (ch) |
● |
Slip Stitch (sl st) |
Finished Measurements
| Measurement | Size |
|---|---|
| Height | 10 inches (25 cm) |
| Width (at widest point) | 6 inches (15 cm) |
| Skill Level | Beginner |
Creative Uses for Your Crochet Wolf
- Baby Shower Gift: Pair with a handmade blanket for a cozy keepsake.
- Nursery Decoration: Hang from a mobile or place on a shelf for a woodland theme.
- Etsy Product: Sell your finished wolves on platforms like Etsy or at craft fairs!
- Birthday Present: Personalize with the recipient’s favorite colors.
- Holiday Ornament: Add a loop and hang as a festive decoration.
yarn for amigurumi Check out our guide to the best yarns for amigurumi projects!
Common Mistakes to Avoid
- Overstuffing: Leads to stretched stitches and an uneven shape. Stuff just enough to hold form.
- Skipping stitch markers: Always mark the first stitch of each round to avoid spiraling.
- Ignoring tension: Keep stitches tight for amigurumi to prevent stuffing from showing.
- Rushing assembly: Take time to align parts symmetrically before sewing.
- Using the wrong hook size: A larger hook makes looser stitches; a smaller hook tightens them.
Tips for Maximizing Results
- Use a stitch counter: Helps track rounds, especially for beginners.
- Block your pieces: Lightly steam or wet-block parts before assembly for a polished look.
- Change colors smoothly: For the belly, carry the yarn up the inside of the piece to avoid knots.
- Add personality: Embroider whiskers or adjust ear shapes for a unique wolf!
- Practice tension: Do a tension swatch first to match the pattern’s gauge.
The Spruce Crafts – Amigurumi Tips Learn more about perfecting your amigurumi technique from experts.
Conclusion
This beginner crochet patterns free Amigurumi Wolf pattern is your gateway to creating adorable, handmade plushies! Perfect for gifts, decor, or personal enjoyment, this project is both fun and rewarding. With clear instructions and a touch of creativity, you’ll have a charming wolf in no time. Ready to start? Download the free pattern and start crocheting your Wolf today!
Frequently Asked Questions
Is this pattern really free?
Yes! This beginner crochet patterns free Amigurumi Wolf pattern is available as a free download. No hidden costs or subscriptions required.
Can I sell the wolves I make from this pattern?
Absolutely! Many crafters sell their finished amigurumi on platforms like Etsy. Just credit the pattern designer if required.
What if I’m a complete beginner?
This pattern is designed for beginners! Start with the head and body rounds to practice. Check out crochet basics tutorial for extra help.
How do I adjust the size?
Use a larger hook and yarn for a bigger wolf, or a smaller hook for a mini version. Keep stitch counts proportional.
Can I use different yarn types?
Yes, but cotton yarn holds shape best for structured amigurumi. Acrylic is softer but may require more stuffing.
Where can I find similar patterns?
Explore free amigurumi patterns on Ravelry – Free Amigurumi or check out our crochet animal patterns collection.